Procedure
 Step 1 – Creating your sketch
1. Download and print the Graph paper by clicking this link
2. Sketch the walls
3. Sketch the windows, door opening, and all major appliances
4. Review your sketch
Step 2 – Send your sketch to PASFloorplan
1. Email your sketch to Profappser@aol.com OR
2. Fax your sketch to (818) 340-4994
Step 3 – Review and Upload your PASFloorplan sketch
1. Open your PASFloorplan sketch and review it for accuracy
2. Upload and use your PASFloorplan sketch like any other image
Step 4 – Payment Options
You will not have pay for your PASFloorplan until you are completely satisfied. Your Invoice will have two payment options for your convenience:
1. Pay with a major credit card via paypal
2. Pay by check
We can transform any sketch into an EZfloorplan!
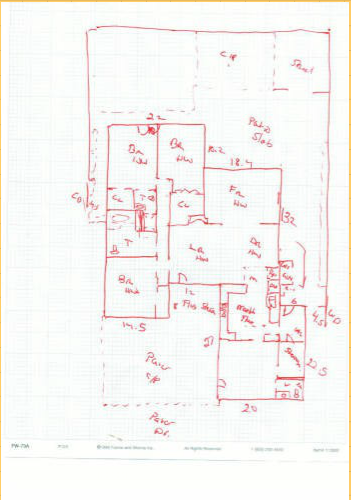
Scroll down this page to see sample sketches.
There is more than one way to quickly and easily create your sketch.
Pick a method that works best for you, remember we want you to be completely satisfied, so you will be able to review your EZfloorplan and send it back for corrections as many times as you like.
All Methods Need :
1. Property name
2. Your Name
3. Your email
4. Clearly written primary room names
5. Do not forget to include other items such as a garage and decks or patios, etc.
Method 1 – Least Accurate
Using regular paper or graph paper
1. Without measuring, simply sketch the outline of the property
2. Sketch in the interior walls using the outline corners as a reference
3. Visually sketch in all the windows, doors and major appliances
4. Primary room sizes are required. Indicate if you want them shown on your EZfloorplan
5. Include steps 1-5 of “All Methods Need” above
Method 2 – Moderately Accurate
Using graph paper
1. Start on a outside corner of the property* and count the number of steps to the next corner, draw the wall on the graph paper using 1 step = 2 squares. Sketch in any windows and doors you see. Turn in the direction of the next wall and repeat the process until you go all the way around.
2. Step-off and sketch in the interior walls, indicate doors and openings as you go
3. Primary room sizes are not required but include them if you what them shown on your EZfloorplan
4. Visually sketch in all major appliances
5. Include steps 1-5 of “All Methods Need” above
Method 3 – Most Accurate
Using graph paper
1. Start on a outside corner of the property* using your tape measure or laser tape, measure and sketch the perimeter walls. Sketch in any windows and doors you see. Turn in the direction of the next wall and repeat the process until you go all the way around
2. Measure and sketch in the interior walls, indicate doors and openings as you go
3. Primary room sizes are not required, but include them if you what them shown on your EZfloorplan
4. Visually sketch in all the windows, doors and major appliances
5. Include steps 1-5 of “All Methods Need” above
* Even if you can not start on a outside corner, you can use this method on the inside of the property, combining steps 1 & 2, working from room to room.
Method 4
Many tax records show the outline of the building along with the wall length
1. Enlarge it on a copy machine
2. Sketch in the interior walls, indicate doors and openings as you go
3. Primary room sizes are not required, include them if you what them shown on your EZfloorplan
4. Visually sketch in all the windows, doors and major appliances
5. Include steps 1-5 of “All Methods Need” above
Method 5
Already have an old floor plan?
1. Have it scanned or take a high resolution digital picture
2. Include steps 1-5 of “All Methods Need” above
